
In the previous post we spoke about cloud computing platform from Amazon and described setup AWS account procedure. For all new AWS customers Amazon provides majority of their services for free during one year. All these facilities enough to launch simple web application, organize DB, test existing application in the cloud or simply grab some experience with AWS. Each month Amazon provides free quote on their services, like:
- 750 hours/month of Amazon EC2 Linux micro instance (this is enough to run continuously each month)
- 750 hours/month of an Amazon ELB
- 30 GB/month of Amazon EBS (plus 2 million I/Os)
- 5 GB/month of Amazon S3 (plus 20,000 Get requests and 2,000 Put requests)
And only if your free usage expires or if your application use exceeds the free usage tiers, you simply pay standard rates.
The process of building Amazon EC2 Linux instance is pretty straightforward and could be divided on 3 simple steps. Initially you should sign in to the AWS Management Console and navigate to the Amazon EC2 tab.
1. Navigate to the Key Pairs section and click Create Key Pair button.
 2. Enter key pair name and press Create button (store key in a safe place on your system).

 3. Select Quick Launch Wizard option, choose previously created key from the list and select Amazon Linux AMI 64 bit as a launch configuration. This configuration is free tier eligible and marked with a yellow star. Then press Continue button.

4. Review proposed configuration and press Launch button. To edit configuration press Edit detailes button.

5. Newly created instance will appear in the list and can be Start/Stop/Reboot/Terminate from the Instance actions menu. Status of the instance will be changed correspondingly.

6. Record the Public DNS name of the instance which will be needed on the last step.
7. Navigate to the Security Groups section and select quicklaunch-x security group rule that was created. New rules could be added with Add Rule button. Currently security group should contain at least one rule that allows SSH traffic from any IP source to port 22.

2. Start PuTTYgen, click Load button and browse for the location of the private key on the system.
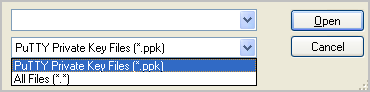
3. Select .pem file and click Open button.


4. Click Save private key (don't press Generate button) and press Yes within warning dialog.

5. Open PuTTY and in the Host Name fields type Public DNS of the instance.

6. Set previously generated private key in the Category menu under Connection>SSH>Auth.

7. Click Open and press Yes within security warning dialog.
8. In the SSH session window login with ec2-user. To run comman as root, prefix the comman with sudo.
In the next post we are going to speak about how to install and configure Tomcat 7 and PostgreSQL 9 on our Amazon Linux instance.
What do you think about such great offer from Amazon? Let's continue the conversation below.
- 750 hours/month of Amazon EC2 Linux micro instance (this is enough to run continuously each month)
- 750 hours/month of an Amazon ELB
- 30 GB/month of Amazon EBS (plus 2 million I/Os)
- 5 GB/month of Amazon S3 (plus 20,000 Get requests and 2,000 Put requests)
And only if your free usage expires or if your application use exceeds the free usage tiers, you simply pay standard rates.
The process of building Amazon EC2 Linux instance is pretty straightforward and could be divided on 3 simple steps. Initially you should sign in to the AWS Management Console and navigate to the Amazon EC2 tab.
Create Key Pair
This key will be needed on the last step for connecting to the Amazon EC2 instance.1. Navigate to the Key Pairs section and click Create Key Pair button.

Launch Amazon EC2 instance
1. Select the Region from the list where instance will be located.
2. From the EC2 Dashboard section or Instances section press Launch Instance to start the wizard.
4. Review proposed configuration and press Launch button. To edit configuration press Edit detailes button.

5. Newly created instance will appear in the list and can be Start/Stop/Reboot/Terminate from the Instance actions menu. Status of the instance will be changed correspondingly.

6. Record the Public DNS name of the instance which will be needed on the last step.
7. Navigate to the Security Groups section and select quicklaunch-x security group rule that was created. New rules could be added with Add Rule button. Currently security group should contain at least one rule that allows SSH traffic from any IP source to port 22.

Connect to instance (from Windows)
1. Download and install PuTTY on your Windows machine.2. Start PuTTYgen, click Load button and browse for the location of the private key on the system.
3. Select .pem file and click Open button.
4. Click Save private key (don't press Generate button) and press Yes within warning dialog.
5. Open PuTTY and in the Host Name fields type Public DNS of the instance.

6. Set previously generated private key in the Category menu under Connection>SSH>Auth.

7. Click Open and press Yes within security warning dialog.
8. In the SSH session window login with ec2-user. To run comman as root, prefix the comman with sudo.
In the next post we are going to speak about how to install and configure Tomcat 7 and PostgreSQL 9 on our Amazon Linux instance.
What do you think about such great offer from Amazon? Let's continue the conversation below.
Appreciative to you, for sharing those amazing expressive acknowledgments. As the reader of this blog, I'll try to do some an incentive in reacting; there's an uncommon game plan that you've crushed in articulating the fundamental goals, as you charmingly put it. Keep Sharing
ReplyDeleteBig Data Hadoop online training in Hyderabad
Hadoop online training in Bangalore
thank you for this information
ReplyDeleteaws training center in chennai
aws training in chennai
Thanks for this Post
ReplyDeleteHanuman Chalisa Lyrics pdf
Hanuman Chalisa Tamil pdf
Hanuman Chalisa English Pdf
Hanuman Chalisa Hindi Pdf
Hanuman Chalisa Bengali Pdf
Hanuman Chalisa Malayalam Pdf
Hanuman Chalisa Gujarati Pdf
Hanuman Chalisa Kannada Pdf
great information, keep posting. AWS Course In Pune
ReplyDeleteSuperb post about amazon ec2 linux instance. Thanks for sharing.
ReplyDeletealso, check Linux classes in Pune